Keywords

.NET (3) .rb (1) *.cod (1) 3110c (1) Algorithm (1) Amazon Cloud Drive (1) amkette (1) Android (1) Apex (6) apex:dynamic (1) API (1) API version (1) Application Development Contest (2) Artificial Intelligence (2) Atricore (1) b2g (1) Binary Search Tree (1) Blackberry Application Development (1) Blackberry Java Development Environment (1) Blender Game Engine (1) bluetooth (2) Boot2Gecko (1) bug fix (1) C (1) C++ (2) Cloud computing (1) Cloud Storage (1) Code Blocks (1) Code for a Cause (2) codejam (1) Coding (1) const_cast (1) Custom Help (1) Dancing With the Googlers (1) Data Structures (1) desktop environment (5) Doubly Linked List (1) Dropbox (1) dynamic visualforce component (1) dynamic_cast (1) Enterprise WSDL (1) Execution Context (1) fedora 14 (1) fedora 17 (5) Firefox OS (1) Flashing Nokia 3110c handset (1) Force.com (7) Gaia (1) Game Developement (1) GCC (2) GDG (2) Goank (1) Google (4) Google Developer Group (2) Google Drive (1) GTK+ (5) HACK2012 (2) Hall of Mirrors (1) help for this page (1) HTML5 (2) HTTP Web Server (1) IDE (1) Identity Provider (1) Intelligent Systems (1) Java (1) JDE (1) JOSSO (1) location based social network (1) me.social (1) MinGW (1) Natural Language Processing (1) Natural Language Toolkit (1) neckphone (1) NLKT (1) Nokia Pheonix (1) Notebook (1) Numeric XML Tags (1) OAuth2.0 (1) OLPC (7) OLPC-XO-1 (7) One Laptop per Child (5) Override custom help (1) Paas (1) Partner WSDL (1) Polymorphism (1) programming contest (1) PyGTK (4) Python (10) Recycled Numbers (1) reinterpret_cast (1) Research (1) REST (1) RM-237 (1) Robotics (1) Ruby (1) Saas (2) Salesforce.com (7) SDK (1) Service Provider (1) Single sign on (1) SOAP (3) Speaking in Tongues (1) SSO Agent (1) SSO Gateway (1) static_const (1) sugar (7) sugar activity (4) sugarlabs (7) SVG (2) Symbiotic AI (1) Tabbed container (1) TCP/IP (1) TCP/IP stack (1) Typecasting (1) typeid (1) ubuntu 13.10 (1) UDP (1) Upgrade Assembly (1) Visualforce (2) Web Server (1) Web Services (3) Web2.0 (1) wikipedia (1) wikipediaHI (1) WSDL (1) XML tags (1)

Sunday, March 10, 2013

Guess whoami : RTTI

Hi guys,

This time we will explore the technique used to determine the type of objects at runtime using Run Time Type Identification(RTTI) in C++.

Basically there are two common ways to achieve this:
1. Use a virtual function in base class and override that method in derived class:
output:


And when you use base class pointer or reference to hold object you may use bptr->typeOf() to detemine the type of object at run time.

2. Another approach which is built into language library is to use typeid() method. This method returns const object of typeinfo type.
For example,


We can also use Explicit Typecasting in C++ using :
dynamic_cast:
 It is used to ensure that the object returned after cast is complete object of requested type. If its not so it returns bad_cast exception in case of references and returns null pointer in case of pointers.
Consider non-polymorphic base class and its derived class:
This will not even clear the compilation phase. It will give this error:
Lets convert base class to polymorphic by adding virtual keyword for hello method in base class and check again. This time it clears compilation and the type is checked at run time. This is purely based on RTTI support by compiler.
static_cast: 
In this cast operator it is not checked that object returned after casting is actually a type of requested object. It is not type safe. Thus it is upto developers to take care when dereferencing. This works for:
  • Implicit conversions
  • Narrowing conversions
  • Conversions from void *
  • base class pointer to derived class pointer 
  • derived class pointer to base class pointer
For example:
This will yield:
const_cast:
This cast is useful to convert const to non-const objects. This is used as another alternative to change const objects in a class without using mutable keyword.
For example,
output:
reinterpret_cast: 
This cast is used to convert any pointer type to any other pointer type, even for unrelated classes. It can also be used to convert int to pointer and other way round.
For example,
This will yield:
I hope this helps you understand basic typecasting mechanism present in C++. Stay tuned for more fun !

Monday, January 7, 2013

WikipediaHI: Offline Wikipedia in Hindi !!


Last week I spent some time working on WikipediaHI activity for Sugar Desktop Environment. I must say it is one of the awesome activities I have come across. The best part is that it can serve you with data in offline mode. That is even if don't have internet connection which is otherwise required to access Wikipedia online, then also your WikipediaHI activity will serve your purpose.

There are lot many developers and contributors who are working in collaborative form on such awesome stuff who continuously inspire you to take up new things and create something that can be used by others in the world. Sugar developers and contributors are epitome of such group.

I came across few of such developers, Anish Mangal and Gonzalo Odiard, two of them whose contributions are significant for Sugar. I took up the task of creating WikipediaHI using Wikipedia dump for Hindi available for free. I followed the steps specified on this page[ hosted by Gonzalo] for creating Wikipedia activity in your own language.

I will quickly explain the steps I took to create WikipediaHI:

1) Downloaded the Wikipedia dump file for Hindi:
http://dumps.wikimedia.org/hiwiki/20121225/hiwiki-20121225-pages-articles.xml.bz2
NOTE: [ Make sure you pick the valid latest file from here : http://dumps.wikimedia.org/hiwiki/   this location will show you listing as per dates. Pick the latest dump and proceed further.]

and downloaded WikipediaBase from this link

2) Created "hi" directory for HINDI under WikipediaBase directory and moved the downloaded dump to this folder.

3) Extracted contents of this file using:
bzip2 -d hiwiki-20121225-pages-articles.xml.bz2

4) Processed the dump using page parser:
../tools2/pages_parser.py

The result of this operation will generate these files:
hiwiki-20121225-pages-articles.xml.links
hiwiki-20121225-pages-articles.xml.page_templates
hiwiki-20121225-pages-articles.redirects
hiwiki-20121225-pages-articles.templates

5) Then you can include selective articles or all articles from this dump to your activity by using this command:
../tools2/make_selection.py
* Make sure you have favorites.txt and blacklist.txt filled with appropriate keywords.

Now if you want to include all articles use this command:
../tools2/make_selection.py --all

6) Then proceed to create the index for these articles:
../tools2/create_index.py

7) In order to test the index created in previous step you can use this command:
../tools2/test_index.py

8) Next step is to expand the templates of articles :
cd ..
./tools2/expandtemplates.py hi

9) Go back to hi directory and re-create the index :
cd hi
mv hiwiki-20121225-pages-articles.xml.processed_expanded hiwiki-20121225-pages-articles.xml.processed
../tools2/create_index.py --delete_all

10) Download the images for the articles you selected:
cd hi
../tools2/download_images.py

if you want to download the images for pages you selected in previous step:
../tools2/download_images.py --all

11) Create files specific to language:
(a)activity/activity.info.lang : activity info file for you language activity
(b)activity/activity-wikipedia-lang.svg : activity icon for your language
(c)activity_lang.py : activity file for your language
(d)static/about_lang.html : about page for wikipedia in your language.
(e)static/index_lang.html : index page for wikipedia in your language. This is the page displayed when activity is launched. So its important for you to know the articles included in the search.db ( generated when index is created) for you to create the index page.


12) Create the XO file for wikipedia in your language:
./setup_new_wiki.py hi/hiwiki-20121225-pages-articles.xml

I went through the search.db file to identify the articles present in it and create the index page accordingly.
This gave me an idea to write some script that can generate index page(part or whole) to be used as home page for activity using search.db[ Stay tuned for next blog on this idea]

Here you go.. you can see WikipediaHI

On launching this, you can see the index page listing the articles you can view offline using WikipediaHI

If you want to play with WikipediaHI, you can download it : WikipediaHI-35.xo

I must thank Gonzalo for his amazing help and guidance in getting this done. I have to mention here that Wikipedia
changed its XML format in their dumps which resulted in error when I was creating the index. I took Gonzalo's help to get it resolved.
Thanks to Anish, who motivated me to pick this up and guided me to complete it.

Thanks guys !! :D

Thursday, December 20, 2012

gtk.Notebook widget within Sugar Activity !


This post describes how to use gtk.Notebook widget within a Sugar Activity.
In this blog you can find how to use gtk.Notebook widget to create PyGTK application native to GNOME. Now we will consider how sugar shell understands this Notebook widget and renders it for Sugar Desktop Environment.


Consider we have sugar activity DevelopWeb with following directory structure:
Here we have created weblib.py to include class WebToolBox that renders a toolbox on left hand side pane and tabbed container, i.e. Notebook on right side pane. Note that we are using HBox to hold this WebToolbox and Notebook widgets. Since there are only two widgets added to HBox we are using terms left side pane and right side pane.

weblib.py looks like this:

Here you can observe that we have added all the widgets in the constructor of WebToolbox class. We have used HBox as parent container. Then we have used a VBox as elementBox or  toolbox for this activity to hold the web elements. Then we set few properties for scrollable window inside elementBox. We add the buttons in this elementbox with appropriate properties. Then we add the Notebook widget with gtk.POS_TOP ( i.e. tabs will be visible on top).

Now we add the pages to this notebook instance using a custom method "addPage"(Refer to image below). You can see in the definition that a page is a container HBox as immediate child of Notebook within a page. Each page requires a Label widget as page label:

The basic activity file looks like :
Here within constructor of DevelopWeb class you can observe that we have use instance of WebToolBox class which inturn uses Notebook widget. we have used this WebToolBox instance to be placed as viewport of the activity. You can create a setup.py file required for activity.

Now when you create symbolic link for this activity using : python setup.py dev the Sugar Desktop Environment can use this activity.
When you start Sugar session you can see DevelopWeb activity:

When you launch this activity you can see elementBox on left side and Notebook on right side with two tabs or pages in it:


This example shows how you can use Notebook, the tabbed container in your sugar activity. I hope this post helps you.

Stay tuned for more Sugar Action !

Tuesday, December 18, 2012

Notebook: Tabbed container in PyGTK

Hi,

I am writing this post to share my experience with Notebook, the tabbed container in PyGTK. If you are planning to develop your application in platform independent form, I would prefer you should go for PyGTK.

GTK+, or the GIMP Toolkit, is a multi-platform toolkit for creating graphical user interfaces. Offering a complete set of widgets, GTK+ is suitable for projects ranging from small one-off tools to complete application suites. This consists of toolkit which runs on Windows based and Linux based system. Thus you can write your application using GTK+ and run on any OS. Python bindings for GTK+ is known as PyGTK.  PyGTK lets you to easily create programs with a graphical user interface using the Python programming language.

Another prominent OS or Desktop Environment or Shell which used across XO Laptops as part of OLPC project that can run applications developed in PyGTK is Sugar. Few days ago I was looking for Tabbed container in PyGTK for a Sugar Activity I am working on. I came across Notebook.  It is similar to TabControl in .Net framework but with few dissimilarities.

Lets dive into code:
1. Import required modules: In order to use GTK modules in your python program you need to include gtk and pygtk modules.
Apart  from modules you can import specific widgets like Window, Label or Button and Notebook. Otherwise you need to use gtk.Window, gtk.Notebook.

2. Now lets write a class KartikNoteBookExample. You can see the constructor __init__(self) where we have created an instance of Window[line 13]. Then we set the title and default size for window in next two lines. In line 16, we have linked a callback function that will be invoked when when destroy signal will be sent by window widget. you can observe that we have defined a destroy method which inturn calls gtk's main_quit() method to close the main thread which was initially started using the main() method.


We now proceed by creating an instance(i.e. mynb) of Notebook [line 18]. In line 19, you can see we are using method set_tab_pos which is used to set the position of tabs. It can take one of the following values:
gtk.POS_LEFT, gtk.POS_RIGHT, gtk.POS_TOP or gtk.POS_BOTTOM. In line 20, we have connected a method to be called on "switch-page" event of Notebook. Whenever the page is changed in Notebook this event is fired. Since now you have connected "self.pageChanged" method on this event, it will be fired whenever page is switched. After that we have called a method "addPage" to add the page in Notebook. In below code, you can see we have created a HBox widget and a Label widget. Label widget is required to add label for tab whereas HBox is used as child for that page. We have added page in Notebook using "append_page" method which takes childWidget and Label as parameters. In line 24, we have added notebook instance as child of window widget.

In line 26, we have defined a method "showall" to show all widgets added so far.
From line 45 to 49, we have added a method "pageChanged" to detect the page switch event or signal for Notebook. The widget passes following parameters to the callback function : notebook instance, page instance and page number instance. We get the selected page using the method "get_nth_page" and passing the page number as  parameter[line 47]. We get the label associated with page using method get_tab_label and passing the immediate child of the Notebook as parameter[line 48]. Now using the "get_text" method of label we can get the text in it and print it.

From line 52 onwards, we are checking if the program is invoked using "python" i.e not imported we create an instance of the KartikNoteBookExample class and invoke its main method.


After saving this if it is invoked like: python .py

You will see a window with two tabs, Tab1 and Tab2.

As you click on Tab pages you can see in terminal that which page has been selected based on page number as clickedMe is called for page switch event.

So we saw how we use Notebook in PyGTK in your application. You may download the source file here.
Stay tuned to see how to create tabbed Notebook for a Sugar Activity.

Friday, October 26, 2012

Force.com API demystified using SoapUI

I am working on a project to create Salesforce.com library for Python. I always wished for fastest web service invocation when it comes to multiple systems interacting with each other. Salesforce.com's Force.com platform exposes its API through enterprise, partner and metadata WSDL. For this purpose I scrutinized the WSDL file very closely and used SoapUI to generate the stub.

Lets jump into steps on how we do it:
1. Create a new project and select WSDL file to load and generate stub by hitting OK button.


 Once the stub is generated you can expand the node to see the list of operations exposed by the server as SOAP interface :

3. Login method:
On expanding any service node, you will see "Request" under it. Double click it to open new window on right side pane. This window will allow you to make HTTP POST requests to server. You can see the SOAP enevelope is already created in left pane in new window. All you need to do is fill in the parameters for the request and hit submit button. IMP: Make sure you set the endpoint properly. You can find this endpoint in bottom part of WSDL file as an attribute of any of SOAP 1.1 or 1.2 binding.
I entered my username and password(password+security token) here and submitted the request. On right side pane you can see the response envelope with my data like sessionId, serverURL, userInfo.

4. Creating Sobject records:
In case you need to perform further operations you need to pay extra attention here. Consider we need to create a case record through SoapUI. Double click on create operation and get the request window. Fill the parameter values as shown. Before submitting make sure you set the endpoint as the URL returned as serverUrl in the response of login method.
On successfully executing this server will return the recordId of Sobject record.


I hope this blog helps you get started on understanding how API works and more specifically the detailed flow of data on HTTP using SoapUI.

Cheers!
Kartik

Wednesday, September 19, 2012

Natural Language Processing with Python

NLTK is a leading platform for building Python programs to work with human language data. It provides easy-to-use interfaces to over 50 corpora and lexical resources such as WordNet, along with a suite of text processing libraries for classification, tokenization, stemming, tagging, parsing, and semantic reasoning.Natural Language Processing with Python provides a practical introduction to programming for language processing. Written by the creators of NLTK, it guides the reader through the fundamentals of writing Python programs, working with corpora, categorizing text, analyzing linguistic structure, and more.

Lets start with steps to install NLTK and other utilities.

Steps:
  1. Install Python: http://www.python.org/download/releases/2.7.3/
  2. Install Numpy (optional):http://sourceforge.net/projects/numpy/files/NumPy/1.6.2/numpy-1.6.2-win32-superpack-python2.7.exe
  3. Install NLTK: http://pypi.python.org/pypi/nltk
  4. Install PyYAML: http://pyyaml.org/wiki/PyYAML
Now if you type the command import nltk at IDLE shell you'll get the nltk module loaded and cursor will come to next line.

Power of NLTK:
1. Tokenizer: This returns you list of tokens present in a sentence you provide as parameter to tokenizer.


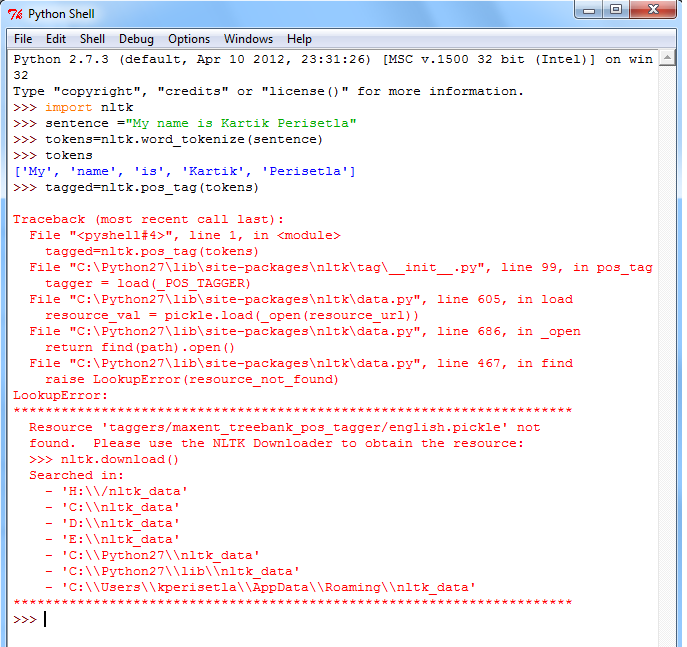
2. Part of Speech tagger: This tags the tokens within sentence with appropriate tags like NP, VP, JJ, etc.

It is possible that you get such error:

You can resolve this with command nltk.download(). This will bring the NLTK downloader:

Select the "book" entry and hit download button. This will start downloading required packages associated with book. In this step we are actually downloading corporus for NLTK.

Once you download the corporus, rerun the same command and you will see sentence being tagged with Nouns, Verbs, Adjective,etc. :

3. Parse Tree using Context Free Grammar(CFG)
Now lets see the power of recursive descent parser in recognizing a sentence apropos to a context free grammar. Consider we have a context free grammar:
S -> NP VP
VP -> V NP | V NP PP
PP -> P NP
V -> "saw" | "ate" | "walked"
NP -> "John" | "Mary" | "Bob" | Det N | Det N PP
Det -> "a" | "an" | "the" | "my"
N -> "man" | "dog" | "cat" | "telescope" | "park"
P -> "in" | "on" | "by" | "with"

Sample sentence that can be produced by this grammar is :
Mary saw Bob

Let see how it works:


- We start with specifying the grammar 
- We split the sentence in tokens by " "( blank space)
- We create instance of recursive descent parser using this grammar
- We create a tree by calling parse method of the parser
- As a result we get the parse tree for the sentence


I hope this post throws some light on natural language processing capabilities of python.


Tuesday, August 7, 2012

Writing Your First Sugar Activity !


The best open source project to work with is "Sugar" primarily developed by SugarLabs and developers, contributors around the world. As a  Sugar Evangelist, I take this opportunity to share this post that describes on how you can get started with your first Sugar activity. The program that runs on Sugar Desktop environment is called as an Activity.


Prerequisites:
  • Familiarity with Python and PyGTK(Python interface for GUI programming using GTK+)
  • Sugar Desktop environment( installed, build or emulator on qemu)
  • GTK+ packages installed on you Linux flavor.
The example Activity shared in the following section has been tested on Fedora 17( Beefy Miracle).

1. Create a directory structure :

mkdir -p KartikActivity.activity/activity

2.Create activity.info :

Create a file inside the "activity" sub directory with name "activity.info" to describe your bundle in the activity sub-directory. The Activity Bundles specification explain in detail the meaning of each field.Write downs attribute names and corresponding values in this file as :


[Activity]
name = Kartik
bundle_id = org.laptop.Kartik
exec = sugar-activity Kartik.KartikActivity
icon = myicon
activity_version = 1.0
show_launcher = yes


example :

3. Activity Icon:

Design an icon for your activity by following the instructions on making icons for Sugar and place it in the activity sub-directory. The file name should match the icon file name specified in the info file (e.g. myicon.svg).

I used the same icon as is used in paint :

4. Create setup.py:

Write the setup.py script in the top level directory (e.g. KartikActivity.activity/setup.py). The content should be like:

from sugar.activity import bundlebuilder
bundlebuilder.start()

A more advanced version, which supports building activity bundles without Sugar installed, looks like this:

 #!/usr/bin/env python
 try:
     from sugar.activity import bundlebuilder
     bundlebuilder.start()
 except ImportError:
     import os
     os.system("find ./ | sed 's,^./,KartikActivity.activity/,g' > MANIFEST")
     os.system('rm KartikActivity.xo')
     os.chdir('..')
     os.system('zip -r KartikActivity.xo KartikActivity.activity')
     os.system('mv KartikActivity.xo ./KartikActivity.activity')
     os.chdir('KartikActivity.activity')

5. Code your activity in Python:

The name you specified in the .info file as "class" is the name of the class which runs your code. For the activity.info file above, we specify a top-level module named KartikActivity.Kartik

The content in Katik.py file :

from sugar.activity import activity
import logging

import sys, os
import gtk

class KartikActivity(activity.Activity):
    def hello(self, widget, data=None):
        logging.info('Hello Kartik')      

    def __init__(self, handle):
        print "running activity init", handle
        activity.Activity.__init__(self, handle)
        print "activity running"

        # Creates the Toolbox. It contains the Activity Toolbar, which is the
        # bar that appears on every Sugar window and contains essential
        # functionalities, such as the 'Collaborate' and 'Close' buttons.
        toolbox = activity.ActivityToolbox(self)
        self.set_toolbox(toolbox)
        toolbox.show()

        # Creates a new button with the label "Hello Kartik".
        self.button = gtk.Button("Hello Kartik")

        # When the button receives the "clicked" signal, it will call the
        # function hello() passing it None as its argument.  The hello()
        # function is defined above.
        self.button.connect("clicked", self.hello, None)

        # Set the button to be our canvas. The canvas is the main section of
        # every Sugar Window. It fills all the area below the toolbox.
        self.set_canvas(self.button)

        # The final step is to display this newly created widget.
        self.button.show()

        print "AT END OF THE CLASS"

6. Create a MANIFEST:

(e.g. KartikActivity.activity/MANIFEST), containing the list of the files (relative to the directory that the MANIFEST is in) to include in the package. (Note: Be sure not to leave blank lines at the end of the file.) This script does that in linux (run it from within the KartikActivity.activity directory):

cd KartikActivity.activity
find . -type f | sed 's,^./,,g' > MANIFEST

Content of MANIFEST should look like this:

activity/myicon.svg
activity/activity.info
MANIFEST
Kartik.py
setup.py

7. Give permissions:

Make sure that all your python files have the required permissions to be used.

chmod a+x setup.py
chmod a+x Kartik.py

8. Bundle your Activity:

Setup your bundle for development (must be user olpc when you do this) to become user olpc, type: su - olpc
If you are prompted for a password, trying using: su

python setup.py dev

This just creates a symlink to your activity folder in ~/Activities, so that Sugar can find your activity.

9. Run your Activity !:

Restart Sugar using Ctrl-Alt-Erase and your activity will appear in the interface! (NOTE: By default, the Home view shows only the favorite activities. You should press Ctrl+2 or go the right-upper corner and change to the List View)

Now you can see your activity is visible within Journal: