Keywords

.NET (3) .rb (1) *.cod (1) 3110c (1) Algorithm (1) Amazon Cloud Drive (1) amkette (1) Android (1) Apex (6) apex:dynamic (1) API (1) API version (1) Application Development Contest (2) Artificial Intelligence (2) Atricore (1) b2g (1) Binary Search Tree (1) Blackberry Application Development (1) Blackberry Java Development Environment (1) Blender Game Engine (1) bluetooth (2) Boot2Gecko (1) bug fix (1) C (1) C++ (2) Cloud computing (1) Cloud Storage (1) Code Blocks (1) Code for a Cause (2) codejam (1) Coding (1) const_cast (1) Custom Help (1) Dancing With the Googlers (1) Data Structures (1) desktop environment (5) Doubly Linked List (1) Dropbox (1) dynamic visualforce component (1) dynamic_cast (1) Enterprise WSDL (1) Execution Context (1) fedora 14 (1) fedora 17 (5) Firefox OS (1) Flashing Nokia 3110c handset (1) Force.com (7) Gaia (1) Game Developement (1) GCC (2) GDG (2) Goank (1) Google (4) Google Developer Group (2) Google Drive (1) GTK+ (5) HACK2012 (2) Hall of Mirrors (1) help for this page (1) HTML5 (2) HTTP Web Server (1) IDE (1) Identity Provider (1) Intelligent Systems (1) Java (1) JDE (1) JOSSO (1) location based social network (1) me.social (1) MinGW (1) Natural Language Processing (1) Natural Language Toolkit (1) neckphone (1) NLKT (1) Nokia Pheonix (1) Notebook (1) Numeric XML Tags (1) OAuth2.0 (1) OLPC (7) OLPC-XO-1 (7) One Laptop per Child (5) Override custom help (1) Paas (1) Partner WSDL (1) Polymorphism (1) programming contest (1) PyGTK (4) Python (10) Recycled Numbers (1) reinterpret_cast (1) Research (1) REST (1) RM-237 (1) Robotics (1) Ruby (1) Saas (2) Salesforce.com (7) SDK (1) Service Provider (1) Single sign on (1) SOAP (3) Speaking in Tongues (1) SSO Agent (1) SSO Gateway (1) static_const (1) sugar (7) sugar activity (4) sugarlabs (7) SVG (2) Symbiotic AI (1) Tabbed container (1) TCP/IP (1) TCP/IP stack (1) Typecasting (1) typeid (1) ubuntu 13.10 (1) UDP (1) Upgrade Assembly (1) Visualforce (2) Web Server (1) Web Services (3) Web2.0 (1) wikipedia (1) wikipediaHI (1) WSDL (1) XML tags (1)

Wednesday, September 19, 2012

Natural Language Processing with Python

NLTK is a leading platform for building Python programs to work with human language data. It provides easy-to-use interfaces to over 50 corpora and lexical resources such as WordNet, along with a suite of text processing libraries for classification, tokenization, stemming, tagging, parsing, and semantic reasoning.Natural Language Processing with Python provides a practical introduction to programming for language processing. Written by the creators of NLTK, it guides the reader through the fundamentals of writing Python programs, working with corpora, categorizing text, analyzing linguistic structure, and more.

Lets start with steps to install NLTK and other utilities.

Steps:
  1. Install Python: http://www.python.org/download/releases/2.7.3/
  2. Install Numpy (optional):http://sourceforge.net/projects/numpy/files/NumPy/1.6.2/numpy-1.6.2-win32-superpack-python2.7.exe
  3. Install NLTK: http://pypi.python.org/pypi/nltk
  4. Install PyYAML: http://pyyaml.org/wiki/PyYAML
Now if you type the command import nltk at IDLE shell you'll get the nltk module loaded and cursor will come to next line.

Power of NLTK:
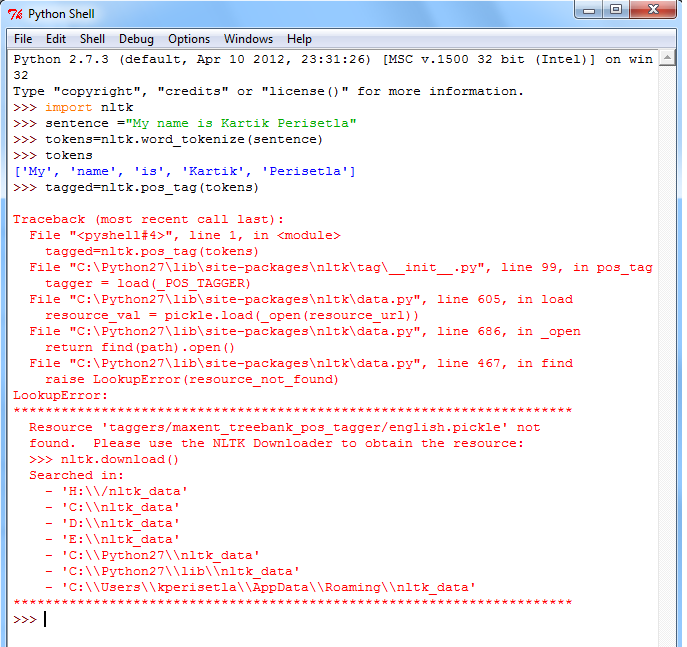
1. Tokenizer: This returns you list of tokens present in a sentence you provide as parameter to tokenizer.


2. Part of Speech tagger: This tags the tokens within sentence with appropriate tags like NP, VP, JJ, etc.

It is possible that you get such error:

You can resolve this with command nltk.download(). This will bring the NLTK downloader:

Select the "book" entry and hit download button. This will start downloading required packages associated with book. In this step we are actually downloading corporus for NLTK.

Once you download the corporus, rerun the same command and you will see sentence being tagged with Nouns, Verbs, Adjective,etc. :

3. Parse Tree using Context Free Grammar(CFG)
Now lets see the power of recursive descent parser in recognizing a sentence apropos to a context free grammar. Consider we have a context free grammar:
S -> NP VP
VP -> V NP | V NP PP
PP -> P NP
V -> "saw" | "ate" | "walked"
NP -> "John" | "Mary" | "Bob" | Det N | Det N PP
Det -> "a" | "an" | "the" | "my"
N -> "man" | "dog" | "cat" | "telescope" | "park"
P -> "in" | "on" | "by" | "with"

Sample sentence that can be produced by this grammar is :
Mary saw Bob

Let see how it works:


- We start with specifying the grammar 
- We split the sentence in tokens by " "( blank space)
- We create instance of recursive descent parser using this grammar
- We create a tree by calling parse method of the parser
- As a result we get the parse tree for the sentence


I hope this post throws some light on natural language processing capabilities of python.


Tuesday, August 7, 2012

Writing Your First Sugar Activity !


The best open source project to work with is "Sugar" primarily developed by SugarLabs and developers, contributors around the world. As a  Sugar Evangelist, I take this opportunity to share this post that describes on how you can get started with your first Sugar activity. The program that runs on Sugar Desktop environment is called as an Activity.


Prerequisites:
  • Familiarity with Python and PyGTK(Python interface for GUI programming using GTK+)
  • Sugar Desktop environment( installed, build or emulator on qemu)
  • GTK+ packages installed on you Linux flavor.
The example Activity shared in the following section has been tested on Fedora 17( Beefy Miracle).

1. Create a directory structure :

mkdir -p KartikActivity.activity/activity

2.Create activity.info :

Create a file inside the "activity" sub directory with name "activity.info" to describe your bundle in the activity sub-directory. The Activity Bundles specification explain in detail the meaning of each field.Write downs attribute names and corresponding values in this file as :


[Activity]
name = Kartik
bundle_id = org.laptop.Kartik
exec = sugar-activity Kartik.KartikActivity
icon = myicon
activity_version = 1.0
show_launcher = yes


example :

3. Activity Icon:

Design an icon for your activity by following the instructions on making icons for Sugar and place it in the activity sub-directory. The file name should match the icon file name specified in the info file (e.g. myicon.svg).

I used the same icon as is used in paint :

4. Create setup.py:

Write the setup.py script in the top level directory (e.g. KartikActivity.activity/setup.py). The content should be like:

from sugar.activity import bundlebuilder
bundlebuilder.start()

A more advanced version, which supports building activity bundles without Sugar installed, looks like this:

 #!/usr/bin/env python
 try:
     from sugar.activity import bundlebuilder
     bundlebuilder.start()
 except ImportError:
     import os
     os.system("find ./ | sed 's,^./,KartikActivity.activity/,g' > MANIFEST")
     os.system('rm KartikActivity.xo')
     os.chdir('..')
     os.system('zip -r KartikActivity.xo KartikActivity.activity')
     os.system('mv KartikActivity.xo ./KartikActivity.activity')
     os.chdir('KartikActivity.activity')

5. Code your activity in Python:

The name you specified in the .info file as "class" is the name of the class which runs your code. For the activity.info file above, we specify a top-level module named KartikActivity.Kartik

The content in Katik.py file :

from sugar.activity import activity
import logging

import sys, os
import gtk

class KartikActivity(activity.Activity):
    def hello(self, widget, data=None):
        logging.info('Hello Kartik')      

    def __init__(self, handle):
        print "running activity init", handle
        activity.Activity.__init__(self, handle)
        print "activity running"

        # Creates the Toolbox. It contains the Activity Toolbar, which is the
        # bar that appears on every Sugar window and contains essential
        # functionalities, such as the 'Collaborate' and 'Close' buttons.
        toolbox = activity.ActivityToolbox(self)
        self.set_toolbox(toolbox)
        toolbox.show()

        # Creates a new button with the label "Hello Kartik".
        self.button = gtk.Button("Hello Kartik")

        # When the button receives the "clicked" signal, it will call the
        # function hello() passing it None as its argument.  The hello()
        # function is defined above.
        self.button.connect("clicked", self.hello, None)

        # Set the button to be our canvas. The canvas is the main section of
        # every Sugar Window. It fills all the area below the toolbox.
        self.set_canvas(self.button)

        # The final step is to display this newly created widget.
        self.button.show()

        print "AT END OF THE CLASS"

6. Create a MANIFEST:

(e.g. KartikActivity.activity/MANIFEST), containing the list of the files (relative to the directory that the MANIFEST is in) to include in the package. (Note: Be sure not to leave blank lines at the end of the file.) This script does that in linux (run it from within the KartikActivity.activity directory):

cd KartikActivity.activity
find . -type f | sed 's,^./,,g' > MANIFEST

Content of MANIFEST should look like this:

activity/myicon.svg
activity/activity.info
MANIFEST
Kartik.py
setup.py

7. Give permissions:

Make sure that all your python files have the required permissions to be used.

chmod a+x setup.py
chmod a+x Kartik.py

8. Bundle your Activity:

Setup your bundle for development (must be user olpc when you do this) to become user olpc, type: su - olpc
If you are prompted for a password, trying using: su

python setup.py dev

This just creates a symlink to your activity folder in ~/Activities, so that Sugar can find your activity.

9. Run your Activity !:

Restart Sugar using Ctrl-Alt-Erase and your activity will appear in the interface! (NOTE: By default, the Home view shows only the favorite activities. You should press Ctrl+2 or go the right-upper corner and change to the List View)

Now you can see your activity is visible within Journal:

Thursday, July 26, 2012

Firefox OS :: Boot to Gecko: Next Gen OS using WebApps from Mozilla !

Firefox OS
B2G Logo


Hello friends,

I was eagerly waiting to dig into Boot to Gecko, build it and run on my Linux machine. I am amazed by concept of using collection of webApps to act as Desktop environment for an OS. Boot to Gecko (B2G) is a new mobile operating system developed as part of the Mozilla project. It uses a Linux kernel and boots into a Gecko-based runtime engine, which lets users run applications developed entirely using HTML, JavaScript, and other open web application APIs.

So what does Boot to Gecko stands for ? Gecko is a Rendering Engine used by Firefox. So they want you to boot up your mobile device directly to Gecko rendering engine-which is responsible for rendering web pages in your firefox browser. Developers contributing to Mozilla have placed all the pieces together to create a complete desktop environment around the Linux Kernel. This is similar to what we have in most of Linux distributions where GNOME is the desktop environment for Linux Kernel.

Another core component of Boot to Gecko project is Gaia, a collection of web apps which make up the UI for the desktop enviroment. All you need to know in order to contribute to this project is HTML5 ! Yes, You read it right, its HTML5. You can develop apps on the fly with HTML5 and rich media and use it. 

Mobile applications are majorly categorized into 3 categories: Native app, Web app and the Hybrid app( mix  of both). So majority of applications being used in the current trend are Web apps and the hybrid apps built using HTML5. Thus, it is a great opportunity for app developers to publish, test their apps on Boot to Gecko and enhance them to explore rich API of the OS.

The concept is to use HTML tags to render application. application will consist of tree of widgets which are also written in HTML5. The rendering engine, Gecko is then responsible to interact with Gaia, run time engine and the Linux Kernel to perform operations. The best part here is that this projects allows developers to explore OS level API, phone level API using HTML tags itself.

So lets dive into steps on how to build B2G Desktop on your machine and start it.

Get the Nightly Build

You can download nightly builds of B2G desktop available here (specifically b2g-16.0a1.en-US.linux-i686.tar.bz2 from this location):  
http://ftp.mozilla.org/pub/mozilla.org/b2g/nightly/latest-mozilla-central/ 

Checkout Gaia

Now checkout Gaia in order to create a profile for running the desktop builds using git. This is a lengthy process, a .bz2 file of approx sixe~160MB is downloaded. So be patient: 
$ git clone git://github.com/mozilla-b2g/gaia


Build Gaia

Once you are done with checkout  you need to build gaia profile using following command:
$ make -C gaia profile


This step creates a profile to access gaia interface. This is very time taking step as it downloads another .bz2 file of approx ~332MB.

Run B2G

Once your make process is complete you can run the B2G desktop build by using this command(make sure you are within b2g directory):
$ ./b2g -profile gaia/profile


You're ready to use your Firefox OS !

Cheers!

Sunday, July 22, 2012

Sugar-build: an alternative to Sugar-JHbuild for Fedora 17


We have seen a complex process involved in building sugar on fedora 14 using JHBuild. Now we have an easy way out to build and run sugar by using sugar-build.

sugar-build it is an alternative of sugar-jhbuild developed by Daniel Narvaez that allow us to get a development version of Sugar easier than with sugar-jhbuild. Also, it works on Fedora 16, 17 and Ubuntu 12.

 Yesterday, I was able to build sugar on my Fedora release 17( Beefy Miracle). So here I am sharing my experience with sugar-build.


These are the steps to build and run sugar on the fly using sugar-build:

Get the source code
You need to get the latest repository of sugar using git

$ git clone git://git.sugarlabs.org/sugar-build/sugar-build.git

Make
Then run the make command to build it( It usually takes 20-30 mins depending on processor and RAM)
$ make

you will see such message once make is complete:


Run
Once the make process is complete you should be able to run your sugar environment
$ make run


and here you go....your sugar is up and running!
You can switch between your fedora environment and sugar by Ctrl+Alt+F1 and Ctrl+Alt+F3
Journal in Sugar

Activity List view in Sugar
Pippy Activity in Sugar

Saturday, July 21, 2012

Building Sugar using JHBuild on Fedora 14


In this post I will describe the process of building Sugar using JHBuild. You can use Debain, Fedora or Ubuntu for this process. Fedora is suggested to avoid conflicts of you want to share your code with community.

  • Make sure you don't follow the following process as root to avoid any unpredictable results that can affect your system.
  • Make sure you have these installed in your system before starting the build process:
    • python: The sugar-jhbuild command is a Python script, so you need the Python interpreter.
    • git: To get the source code of sugar-jhbuild itself and many other Sugar packages you need the git command-line tool from the distributed version control system of the same name. In many distributions the minimal package you need to install is "git-core". 
    • subversion: A few packages (as of January 2010, only squeak and part of etoys) do not use git, and you need the svn command-line tool from the Subversion version control system to get their source code. 
There are basically two ways to do: one is to git clone the sugar base and build it( This will bring out  latest code base from git) and other approach is to download the jhbuild zipped file, extract it and start building it.

 First approach: git clone the sugar base and build it( This will bring out  latest code base from git repository

The first approach gives issues most of the times. Let's dive in details and see what error it gives and what is the root cause for it ?

Check out sugar-JHBuild

Create a directory within your home directory:
So I will be checking out sugar-jhbuild within:/home/kartik/Sugar_Repository
Execute this command to checkout:

You will such output if checkout is successful:

Update Sugar base system and dependencies

Change directory :
cd sugar-jhbuild

Now update the sugar base system by executing this command:
./sugar-jhbuild update

In case you get such error : "ERROR: Could not run lsb_release. Is it installed ?"

It means your systems does not have redhat-lsb package( for Fedora 14)( for Fedora 17 the missing package  is redhat-lsb-core)

You can install this package executing yum command:
yum install redhat-lsb

This will install missing package:


Now rerun the update command:
This time it won't give any error and you see it will check 27 packages and update each of them is required.

After this check for any dependencies the sugar base system has by executing this command:
./sugar-jhbuild depscheck

It will list down list of packages the sugar base system is dependent on:

You can install these dependency packages by executing yum command( you need to use su command for this to go into root mode and then execute yum):
yum install

Once install is complete you can recheck if there is any dependency package left that is not yet installed. This time you get this message if all dependent packages are installed:
"All dependencies are installed"


Build Sugar

Now we can start building this by executing this command:
./sugar-jhbuild build


You will see the progress as :

this goes smooth till package 7. It throws error when building phase 8: telepathy-python:


Now even if we try to install librsvg package using yum, it will ask for gobject-introspection with version>=1.3.0:
checking for gobject-introspection... configure: error: You need to have gobject-introspection >= 1.30.0 installed to build sugar-toolkit-gtk3

you can try to resolve this by yum :
[root@fedora sugar-jhbuild]# yum install gobject-introspection-devel
Loaded plugins: langpacks, presto, refresh-packagekit
Adding en_US to language list
Setting up Install Process
Package gobject-introspection-devel-0.
9.3-1.fc14.i686 already installed and latest version
Nothing to do

 But fedora 14 can have gobject-introspection with version 0.
9.3. which can't be updated.
So this is roadblock in this approach while building sugar using latest JHbuild

Second approach : Download the jhbuild zipped file, extract it and start building it.
Lets dig into another approach where you download the JHBuild version specific to Fedora 14 and then build sugar.

Download the JHBuild zipped file from http://people.sugarlabs.org/
anish/sugar-jhbuild-dx3-0.92.
4dx3-20110725.tar.gz

Then extract the zipped file by executing this command:
 tar -xvf sugar-jhbuild-dx3-0.92.4dx3-20110725.tar.gz

Get into JHBuild directory:
cd sugar-jhbuild-dx3/

Install all packages specified by result of this command( This list down packages on which sugar base is dependent):
./sugar-jhbuild depscheck

Install the packages:
sudo rm -r install/

Build the sugar base:
./sugar-jhbuild build -n -a --clean

Once the build process is complete, you can start the sugar emulator with latest sugar base which you just build:
./sugar-jhbuild run sugar-emulator 

 and there you go ...your sugar desktop environment is up and running!


Courtesy: Anish Mangal for the second approach :)


Happy Hacking !


Friday, July 20, 2012

Sugar Desktop Environment


To all free software distribution evangelists !! You'll love it :D


This time I am sharing my experience with Sugar. Sugar is an open source desktop environment designed with the goal of being used by children for interactive learning. Developed as part of the One Laptop per Child (OLPC) project, it is the default interface on OLPC XO-1 family of laptop computers, but also runs on most computers' hardware. It is available as a LiveCD, as LiveUSB, a package installable through several GNU/Linux distributions, or on Mac OS with virtualization.
Sugar is now developed under the umbrella of Sugar Labs, a nonprofit spin-off of OLPC. Unlike most other desktop environments, Sugar does not use the "desktop", "folder" and "window" metaphors. Instead, Sugar's default full-screen activities require users to focus on only one program at a time. Sugar implements a novel file-handling metaphor (the Journal), which automatically saves the user's running program session and allows him or her to later use an interface to pull up their past works by date, activity used or file type.

The best part of any open source project is that anyone can get involved in it and contribute to it at anytime :). You can checkout the code, go through it, fix the bugs, make changes to code, share the updates as patch with the sugar community. You can become volunteer, Donate online, become a translator, provide support, use your technical knowledge and skills to develop software for SugarLabs.

Sneak Peak into Sugar


This is the home screen for Sugar. Here all the icons you see are links to activities. The user is allowed to run single activity at a time.You will find activities like pippy, browse, calculate, read, chat, turtle art,etc which have been developed/under development for interactive learning. Each activity has been developed by taking into consideration a definite set of factors that ensures good usability design principle. 

An activity is easy to use program developed mainly in python and GTK+. GTK+ (GIMP toolkit) is the native GUI library used for developing cross platform applications. The cross platform nature of Sugar makes it available for Linux distributions, within VM on windows,Mac OS X. It is also available as USB-bootable Linux distribution("Sugar on a Stick")-using this you can install on your hard disk and start using it. Apart from these, it is available for OLPC XO-1.

The awesomeness of sugar is that simplicity is the prime concern in development which is supported by variety of developers across the globe and it is used within a noble project, OLPC.

Are you willing to contribute to this project visit SugarLabs now !


So start contributing today :)
Happy Hacking !

Thursday, July 12, 2012

Simple HTTP Web server in C Language


Hi Guys !


This post helps you to write your own simple HTTP Web server in C language. This will give you a direction on how to proceed with writing web server using Berkeley Sockets( part of Berkeley Software Distribution). Berkeley sockets (or BSD sockets) is a computing library with an application programming interface (API) for internet sockets and Unix domain sockets, used for inter-process communication (IPC). We will get in details of socket in further section.

Lets discuss about traditional client-server architecture. Server is a process/layer which is listening on a port for requests to serve resources. Client is a process/layer which is requesting for the service or resource hosted on the server.

Server listens on a specific port for requests and respond to request on same connection. A socket is basically combination of IP and port number i.e. [IP,port number] defines a socket. As per TCP/IP software stack we can have TCP connection as well as UDP connections. Each have specific purpose. TCP is a connection oriented protocol and UDP is not connection oriented.i.e it send packets independent of each other. UDP does not guarantee delivery of packets.


Lets consider the flow of socket communication between client and server : The diagram shown below describes sequence of function call made to establish socket connection and exchange data.
 Server:
1. Invoke socket() function to get socket identifier. set options for socket if required using setsockopt()
2. Invoke bind() function to bind server to a specific IP and port number.
3. Invoke listen() function to make server listen on port for incoming requests.
4. Invoke accept() function whenever incoming request is received.
5. Exchange data using send() and recv() functions.
6. Terminate the socket connection using close() function.

Client:
1. Invoke socket() function to get socket identifier. set options for socket if required using setsockopt().
2. Invoke connect() function to connect to a server listening for requests at specific IP and port.
3. Once connection is established, exchange data using send() and recv() functions.
4. Terminate the socket connection using close() function.

I have shared the code for HTTP server written in C Language which returns HTML data on GET request at 8080 port:


/*
/*
Simple HTTP Web Server 
By : Kartik Kumar Perisetla(kartik.peri@gmail.com)
hosted for http://kperisetla.blogspot.com
*/

//for windows 
#include<winsock2.h>

// for POSIX based systems use- #include<sock.h> in place of #include<winsock2.h>

#include<sys/types.h>
#include<stdio.h>
#include<string.h>
#include<stdlib.h>
#include<unistd.h>
#include<errno.h>
#pragma comment(lib, "Ws2_32.lib")


//function specific for Windows-to be called before invoking call to socket()
int init()
{
 WSADATA wsaData;
 int iResult;

 // Initialize Winsock
 iResult = WSAStartup(MAKEWORD(2,2), &wsaData);
 if (iResult != 0) 
 {
  printf("WSAStartup failed: %d\n", iResult);
  return 1;
 }

}

//function specific for windows-to be called after all socket communication is complete
void clean()
{
 WSACleanup();
}
int main()
{


 while(1)
 {
  init();
  server();
  clean();
 }
  
    return 0;
} 

void server()
{
 
        int sock, connected, bytes_recieved , true = 1;  
        char send_data [1024] , recv_data[1024];       

        struct sockaddr_in server_addr,client_addr;    
        int sin_size;
        
        if ((sock = socket(AF_INET, SOCK_STREAM, 0)) == -1) {
            perror("Socket");
            exit(1);
        }

        if (setsockopt(sock,SOL_SOCKET,SO_REUSEADDR,&true,sizeof(int)) == -1) {
            perror("Setsockopt");
            exit(1);
        }
        
        server_addr.sin_family = AF_INET;         
        server_addr.sin_port = htons(8080);     
        server_addr.sin_addr.s_addr = INADDR_ANY; 
        //bzero(&(server_addr.sin_zero),8); --This is for POSIX based systems
  memset(&(server_addr.sin_zero),0,8);
        if (bind(sock, (struct sockaddr *)&server_addr, sizeof(struct sockaddr))== -1) 
    {
            perror("Unable to bind");
            exit(1);
        }

        if (listen(sock, 5) == -1) 
  {
            perror("Listen");
            exit(1);
        }
  
  printf("\n\nMyHTTPServer waiting on port 8080");
        fflush(stdout);
        

            sin_size = sizeof(struct sockaddr_in);

            connected = accept(sock, (struct sockaddr *)&client_addr,&sin_size);

           // printf("\n I got a connection from (%s , %d)",
                //   inet_ntoa(client_addr.sin_addr),ntohs(client_addr.sin_port));

   char kk[9999];
   recv(connected,kk,sizeof(kk),0);
   printf("\n Received:%s",kk); 
   
   char xx[9999];
   strcpy(xx,"HTTP/1.1 200 OK\nContent-length: 47\nContent-Type: text/html\n\n<html><body><H1>Hello Kartik</H1></body></html>");
   
   int c=send(connected,&xx,sizeof(xx),0);
   printf("\nSTATUS:%d",c);
     
   printf("\nSent : %s\n",xx);
   
            close(sock);
   WSACleanup();
}


After writing this code, compile it and run it. I compiled this code using GCC compiler version 4.5.2.
GCC comes within Linux OS. For windows systems you can download minGW which consists of gcc, g++,etc.


Once you start the server by double clicking server.exe file you will see like this:

Now open up browser and navigate to URL : http://127.0.0.1:8080 and see the server responding to your request with web page. i.e HTML data:
and in the server console you can see the request structure and response returned:

I hope this post helps you in understanding the concept of socket communication and writing a simple HTTP web server in C language. 

Cheers !